
White Specks in DTF Prints: Causes, Tests, and Fixes
Seeing small white or light-colored dots underneath a cured transfer does not automatically mean your adhesive powder is bad. Here is how to identify the stage creating the defect and fix it without changing several settings at once.
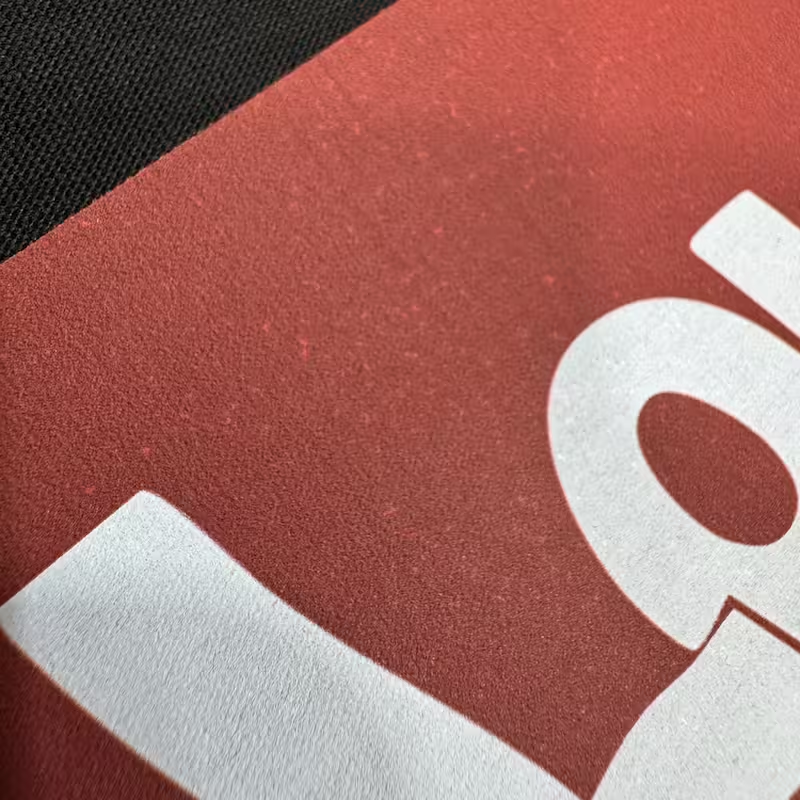
White specks in DTF prints can come from several different parts of the production process. Possible causes include missing CMYK nozzles, inconsistent white ink flow, dust on the film, tiny transparent pixels in the artwork, excess adhesive powder, powder clumps, uneven curing, or contamination introduced during pressing.
The difficult part is that these problems can look similar after the transfer is already on the shirt. Once the ink, white underbase, adhesive powder, and garment have been pressed into one finished layer, it becomes harder to tell which stage created the defect.
That is why the most important troubleshooting step is not immediately replacing your powder or increasing your white ink density. Instead, inspect the transfer at several points during production and determine exactly when the specks first appear.
TL;DR: What Should You Check First?
Inspect the printed film before applying powder. If the dots are already visible, the problem is probably related to ink output, clogged nozzles, the artwork, RIP settings, alignment, dirty film, or inconsistent white ink delivery.
If the print looks clean before powdering but develops dots afterward, investigate clumped powder, moisture, static, dirty recycled powder, powder sticking to unprinted film, and incomplete removal of excess powder.
If the transfer remains clean until it is cured or pressed, check curing consistency, press temperature, pressure, garment lint, moisture, protective sheets, and platen contamination.
An ink stirrer can help keep white ink moving, but having one does not prove that the dampers, lines, circulation system, printhead, or individual nozzles are operating correctly.
What White Specks in DTF Prints Usually Mean
A DTF transfer is built in layers. The color image is printed onto coated film, an opaque white layer is printed behind the color, adhesive powder bonds to the wet ink, and the powder is then melted before the transfer is applied to the garment.
When a small section of the color layer is missing or too thin, the white underbase may become visible through it. On a solid red design, this can appear as a small white, pink, orange, or light-red pinhole after pressing.
When excess powder is responsible, the defect often behaves differently. Powder-related specks may feel raised, gritty, or slightly rough. They may also appear outside the intended printed area or form irregular clusters instead of following a printhead pattern.
What the Reference Photo Suggests
In the supplied photo, the marks appear scattered throughout the solid red portion of the design. They do not appear limited to the outside edge of the graphic, and many of them look embedded within the color rather than sitting as obvious loose granules around it.
Based on that appearance alone, the first areas we would investigate are:
- Partial CMYK nozzle dropout or inconsistent red ink deposition
- Tiny gaps in the color layer exposing the white underbase
- Dust, oil, fingerprints, or coating imperfections on the film
- Small transparent or low-opacity pixels hidden in the artwork
- White-to-color registration or printhead alignment issues
This is not a final diagnosis from the photo alone. If the marks feel gritty or raised when you run a finger across the cooled print, adhesive powder moves higher on the suspect list. If the surface feels smooth and the dots appear to be part of the image, ink deposition or film contamination becomes more likely.
Is It a DTF Powder Problem or an Ink Problem?
Use the point at which the defect first becomes visible to narrow the cause.
| What You Observe | Most Likely Area | What to Check Next |
|---|---|---|
| Dots are visible immediately after printing, before powder. | Ink, nozzles, film, artwork, RIP, or alignment | Run nozzle checks, inspect the artwork, check film cleanliness, and verify color-to-white registration. |
| Print is clean before powder, but dots appear after powdering. | Powder application or contamination | Check for clumps, moisture, dirty recycled powder, static, and incomplete removal of excess powder. |
| Dots appear only after curing. | Powder melting or curing consistency | Check temperature distribution, conveyor speed, heater distance, airflow, and powder compatibility. |
| Transfer looks clean on film but develops spots after pressing. | Garment or heat-press stage | Inspect lint, garment moisture, platen debris, cover sheets, actual temperature, and pressure distribution. |
| The same dots repeat in the same locations on every print. | Artwork, RIP data, or repeating nozzle issue | Print a new solid-color test file and compare the pattern. |
| The dots move randomly from print to print. | Contamination, static, film handling, or intermittent ink flow | Clean the workflow, inspect ink delivery, and test fresh film and powder. |
| Specks are rough, raised, or occur outside the image. | Excess or stray adhesive powder | Improve powder removal and inspect humidity, static, and recycled powder quality. |
| Specks are smooth and appear beneath the color. | CMYK pinholes or white underbase showing through | Check the color nozzle pattern, ink flow, print mode, film surface, and artwork opacity. |
Could the White Ink Stirrer Be the Problem?
Possibly, but the presence or absence of an ink stirrer does not provide the complete answer.
White DTF ink requires consistent movement and maintenance because its pigment can separate more readily than standard CMYK inks. A properly working agitator or circulation system helps keep the ink in the storage container mixed.
However, the storage container is only the beginning of the ink path. Ink still has to travel through tubing, filters, dampers, circulation lines, manifolds, and the printhead before reaching the film.
A printer can therefore have an operating tank stirrer and still experience:
- Partially clogged white or CMYK nozzles
- Air bubbles in the ink line
- A restricted damper or filter
- Weak circulation at the printhead
- Ink settling in a section of tubing
- A dirty cap top or weak head-cleaning seal
- Expired, contaminated, or incompatible ink
- Insufficient maintenance after idle periods
This is why manually stirring the tank every morning or installing an automatic agitator may improve consistency without completely resolving the specks.
The Practical Answer
Verify that the stirrer and circulation system are working, but immediately follow that test with separate CMYK and white nozzle checks. If the nozzle pattern is not complete, troubleshoot ink delivery and head maintenance before changing powder, curing, or pressing settings.
The Four-Stage Test That Finds the Actual Cause
The fastest way to solve recurring white dots on DTF transfers is to create one controlled test file and inspect it throughout production.
Create a simple test graphic containing a solid red rectangle, a solid black rectangle, a solid blue rectangle, and a white block. Do not use gradients, transparency, distressing, texture, or imported artwork.
Inspect Before Powder
Print the test and inspect it under strong side lighting or with light passing through the film. Use your phone camera's zoom or macro mode. If pinholes already exist, stop there. Powder is not the original cause.
Inspect After Powder
Apply powder while the ink is wet, remove the excess, and examine both the printed area and clear film. Look for clumps, stray grains, uneven coating, or powder remaining beyond the design.
Inspect After Curing
After curing, check whether the adhesive has melted evenly. Look for dry grains, heavily bubbled areas, shiny burned sections, or visible differences across the width of the film.
Inspect After Pressing
Press the test onto a clean, lint-rolled garment. Record the exact time, actual temperature, pressure, peel method, and final-press settings. Compare the finished shirt with your earlier photos.
Change only one variable during each additional test. Changing powder, temperature, white density, print resolution, and pressure at the same time may produce a better transfer, but it will not tell you which adjustment solved the defect.
1. Missing CMYK Nozzles or Inconsistent Ink Output
When the specks appear inside a solid color, begin with the CMYK nozzle check—not only the white channel.
A missing magenta or yellow nozzle can create a lighter spot in a red area. If enough color is missing, the white underbase behind the CMYK layer may become visible after pressing.
Run the nozzle check before printing the next customer job. If lines are missing, use the cleaning procedure recommended for your machine. Avoid repeatedly performing heavy cleanings without checking between cycles, since unnecessary cleaning can consume ink and may not solve a restricted damper, air leak, dirty cap top, or mechanical ink-flow problem.
Check Both White and CMYK
Operators often focus only on white ink because the visible defect is white. However, the white layer may be printing correctly while the color layer above it contains tiny gaps.
Confirm:
- The CMYK nozzle pattern is complete
- The white nozzle pattern is complete
- The cap top seals correctly during cleaning
- The wiper and printhead perimeter are clean
- No dampers contain visible air or foam
- The circulation return is moving ink consistently
- The printhead height or film gap is appropriate
- The film is flat and not lifting toward the head
Check Printhead Alignment
Misalignment between the CMYK image and white underbase can produce white edges, halos, or tiny exposed areas. Run the alignment procedure intended for film or dark-media printing and verify that the white layer is positioned directly behind the color.
2. Common DTF Powder Problems
If the transfer is clean before powdering, inspect the adhesive powder and application process.
Powder Clumps
Adhesive powder can absorb moisture during storage or repeated exposure to the production environment. Instead of flowing freely, it may form small clusters that do not coat or melt consistently.
Store powder in a tightly sealed container, keep scoops and trays dry, and avoid leaving large amounts exposed when production is finished.
Too Much Recycled Powder
Recycled powder can collect cured fragments, fibers, dust, ink residue, and larger particles over time. Sift reclaimed powder and avoid repeatedly returning visibly contaminated material to the active supply.
Powder Sticking Outside the Printed Area
Powder should adhere to the wet printed ink—not remain across large areas of clear film. If it continues sticking outside the design, investigate:
- Static electricity
- Moisture on the film
- Oil from hands or fingerprints
- Dirty film coating
- Insufficient shaking or tapping
- Powder that is too fine for the current process
- Contaminated shaker brushes, trays, or collection areas
Use clean gloves when handling film and avoid touching the coated printing area. Powder should be applied evenly while the ink remains wet, and loose excess should be removed before curing.
3. Film Contamination, Static, Dust, and Humidity
DTF film can attract dust and powder before it ever reaches the printer. Small particles on the coated surface may prevent an ink droplet from spreading correctly, leaving a pinhole in the finished color layer.
Film should be stored sealed, flat, and protected from contamination. Avoid placing sheets on cardboard, dusty tables, fabric, or powder-covered equipment before printing.
Check Which Side You Are Printing On
Many films have a designated coated printing side. Printing on the wrong side can cause poor wetting, beading, inconsistent ink coverage, powder adhesion problems, and unpredictable peeling.
Keep the Film Flat
Curled, bowed, wrinkled, or lifted film changes the distance between the surface and printhead. That can contribute to grainy output, blurry edges, misting, poor registration, or inconsistent droplets.
Control the Production Environment
Very dry conditions can increase static, while excessive humidity can contribute to moisture-related powder and film problems. A controlled middle range is generally more stable than large daily swings.
Follow the operating range provided by your printer, film, ink, and powder manufacturers. As a practical troubleshooting target, many professional DTF systems specify an environment near 40% to 60% relative humidity during operation.
4. Uneven Curing or Heat-Press Conditions
Adhesive powder must melt consistently across the entire transfer. A heater with hot and cold zones can leave some sections under-cured while other areas receive too much heat.
Follow the powder manufacturer's recommended time and temperature rather than relying on a universal setting. Fine, medium, and coarse powders may behave differently, and oven settings cannot always be transferred directly from one machine to another.
Signs of Inconsistent Curing
- Loose dry grains remain after curing
- Some areas look smooth while others remain sandy
- The adhesive develops extreme bubbling
- One side of the sheet cures differently from the other
- The transfer develops glossy, scorched, or brittle areas
- The defect becomes visible only after the film passes through the oven
Check the Heat Press Separately
A press display can show the correct setting while the platen surface contains temperature differences. Uneven pressure can also prevent part of the transfer from bonding or flattening consistently.
During testing:
- Clean the lower platen and upper platen cover
- Use a fresh protective sheet or clean parchment
- Lint-roll the garment
- Pre-press briefly when moisture is suspected
- Avoid pressing across thick seams, collars, zippers, or pockets
- Verify that the platen closes evenly
- Use the peel method recommended for the specific film
- Complete the recommended finishing press
5. Hidden Transparency or RIP Settings
Before taking apart the ink system, test a newly created solid-color shape. Artwork downloaded from the internet, exported from design apps, or passed through background-removal tools may contain tiny transparent pixels that are difficult to see on a monitor.
Zoom in closely with the transparency grid enabled. Check for:
- Noise from automatic background removal
- Low-opacity texture inside solid colors
- Distress effects that were unintentionally retained
- Soft eraser marks
- White pixels embedded in the design
- Compression artifacts from low-resolution JPEG files
- Halftones below the printer's reliable dot size
Print a Control File
Create a fresh rectangle directly inside the RIP or design software and fill it with a solid color. If the control rectangle prints cleanly but the customer's artwork does not, the printer and powder may be functioning correctly.
Review White Underbase Settings
Excessive white density does not automatically solve pinholes. It can increase ink load, curing demands, and the finished print's thickness.
Review white density, choke, underbase generation, resolution, pass count, and color-to-white alignment using a controlled test rather than increasing everything at once.
The Best Order for DTF Transfer Troubleshooting
Work through the following order so the easiest and most likely causes are checked before expensive parts are replaced.
Recommended Diagnostic Order
- Inspect the artwork at high magnification with transparency visible.
- Print a new solid-color control file.
- Run complete CMYK and white nozzle checks.
- Clean or service the printhead system only as required by the test.
- Confirm white agitation and circulation are actually operating.
- Inspect dampers and lines for air, foam, restrictions, or weak flow.
- Use a fresh sheet or section of known-good film.
- Handle the film with clean gloves and keep it completely flat.
- Inspect the print before applying powder.
- Test fresh, dry, sifted powder.
- Remove all loose excess powder.
- Inspect the transfer immediately after powdering.
- Cure using the consumable manufacturer's recommended settings.
- Inspect again before pressing.
- Press onto a clean test garment using verified temperature and pressure.
The point where the specks first appear identifies the section of the workflow that needs attention.
How to Prevent White Dots on DTF Transfers
A short documented routine is more effective than waiting for visible defects to appear.
Before Printing
- Confirm the room is within your equipment's recommended temperature and humidity range.
- Check white ink agitation and circulation.
- Run and document a nozzle check.
- Clean the cap, wiper, and surrounding maintenance area as required.
- Inspect film for dust, fingerprints, curl, or coating damage.
- Review unfamiliar artwork for transparency and low-resolution artifacts.
During Printing and Powdering
- Keep film flat and properly loaded.
- Inspect solid colors before powder is applied.
- Apply powder while the ink is still wet.
- Remove loose powder from clear film and small interior spaces.
- Do not return visibly contaminated powder to the clean supply.
During Curing and Pressing
- Use controlled time and temperature appropriate for the powder.
- Watch for differences across the heater or oven width.
- Keep press covers, platens, and protective sheets clean.
- Lint-roll garments used for quality-control tests.
- Record settings when a transfer produces a clean result.
When Should the Transfer Be Reprinted?
A transfer containing visible pinholes, stray powder, incomplete white coverage, severe banding, or inconsistent adhesive should generally be reprinted rather than sent to a customer.
Pressing may make a minor defect more noticeable, and additional heat usually does not restore missing CMYK droplets. Catching the issue while the transfer is still on film prevents wasted garments and makes the original cause easier to identify.
Customers ordering custom DTF transfers from Hollywood Prints receive press-ready transfers produced and inspected in-house. You can also create a layout using our DTF gang sheet builder or review our DTF application instructions before pressing.
Frequently Asked DTF Troubleshooting Questions
Why is DTF powder sticking outside my design?
Powder may stick outside the printed area because of static, moisture, fingerprints, contaminated film, dirty recycled powder, or insufficient removal of excess powder. Handle the film with clean gloves, use dry powder, keep the production environment stable, and tap or shake away all loose powder before curing.
Why does my DTF print have a white outline around it?
A white outline usually points to misregistration between the CMYK layer and white underbase or an underbase choke setting that is too low. Run the appropriate printhead alignment and review the RIP's white choke or reduce-white-area setting.
Why are the edges of my DTF transfer lifting?
Lifting edges commonly come from insufficient pressure, low actual platen temperature, short pressing time, pressing over a seam, incorrect peeling, or incomplete powder curing. Verify the press, follow the film's peel instructions, and test on a flat garment area.
Why does my DTF transfer look grainy or faded?
Grainy output may come from missing nozzles, low-resolution artwork, excessive head gap, curled film, alignment problems, or a low-quality print mode. Begin with a nozzle check and a high-resolution solid-color control test.
Why is my DTF transfer cracking after washing?
Early cracking can be caused by incomplete powder curing, insufficient press pressure, incorrect finishing press settings, an incompatible powder-and-ink combination, excessive ink load, or washing before the transfer has fully settled. Confirm production settings and wash garments inside out using cold water and low heat.
Why will my DTF film not peel cleanly?
The film may be peeled at the wrong temperature, pressed with insufficient heat or pressure, used on the wrong coated side, or paired with incompatible powder. Confirm whether the film is hot, warm, or cold peel and follow that film supplier's instructions.
Can an ink stirrer completely prevent DTF white ink problems?
No. A stirrer helps keep ink mixed in the reservoir, but it does not confirm that the ink lines, filters, dampers, circulation path, cap top, printhead, and individual nozzles are healthy. Continue performing white and CMYK nozzle checks and the maintenance required by the printer manufacturer.
Should I increase white ink density to cover the specks?
Not before determining the cause. Increasing white density will not repair missing CMYK nozzles, dirty film, artwork transparency, or excess powder. It may also increase curing requirements and produce a thicker transfer. Diagnose the stage creating the dots first.
Final Answer: How Do You Stop White Specks?
To stop white specks in DTF prints, inspect the film before powdering and determine whether the defect already exists in the printed ink. If it does, focus on CMYK and white nozzle checks, ink flow, alignment, film cleanliness, and artwork transparency.
If the print is clean until powder is applied, test fresh dry powder, control humidity and static, remove all excess powder, and clean the powdering area. If the defect appears only after curing or pressing, verify the cure, garment preparation, platen cleanliness, actual heat, and pressure.
Do not rely on the ink stirrer as proof that white ink delivery is working correctly. It is one important part of the system, but it cannot replace a complete nozzle check and stage-by-stage test.
Technical References
This troubleshooting guide was informed by professional DTF production experience and official printer-manufacturer guidance.